 Success-Plan Services
.jpg) Brian Senese
Brian Senese

As the title states, this article is all about guiding any developer through the process of creating a DDS application consisting of a Publisher executable and Subscriber executable. I could present a very simple methodology to get things working fast, but that approach would overlook the many RTI tools available that are really valuable when designing a complex system destined for deployment. An assumption here is that you are familiar with Data Distribution Service™ (DDS) system operation at a basic level. If that isn't the case for you, an excellent way to get that foundation in place would be to attend one of RTI’s DDS webinars on the subject.
I’ve broken this basic tutorial down into two parts: Part 1 will address the preliminary design work – such as data modeling and Quality of Service (QoS) configuration – and conclude with generating a source code template. Part 2 picks up with taking the generated source code, modifying it, creating Publisher and Subscriber executables, and verifying its operation.
Throughout this exercise, RTI Connext® Tools are used to assist the developer. This is really a fundamental aspect of application creation – knowing how to use the Connext Tool suite to accelerate development. Let’s get started!
Part 1: Setting the Foundation
Data communications schemes are generally selected to suit a particular type of system. DDS for instance is an optimal architecture for:
- Real-time data movement
- Mission-critical distributed systems
- Multi-year lifecycle deployments that can scale and support future enhancement
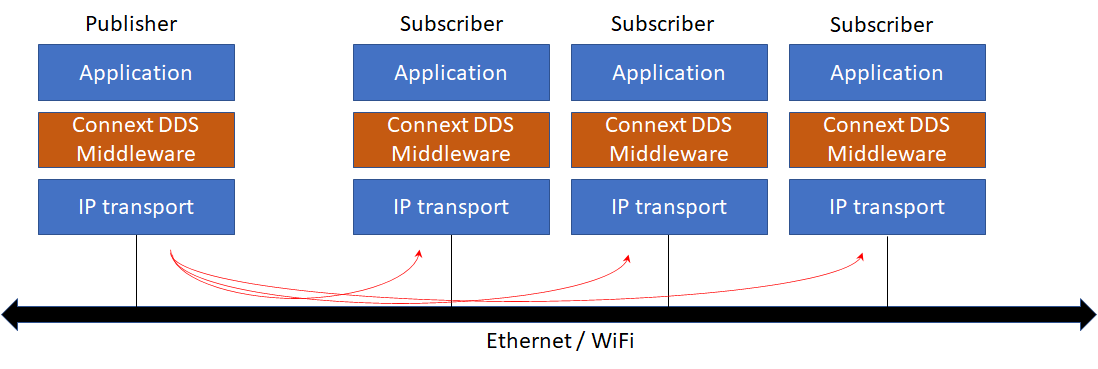
DDS is unique in that it offers value in a basic form or it can be fully decked out to manage significantly complex distributed systems. For the newcomer, DDS follows an efficient pub-sub pattern passing structured data in real-time between nodes, typically using IP/UDP and multicast. Data flow between nodes is fully configurable, as defined by QoS settings.
DDS system design involves: 1) defining data structures (called topics) to be passed; and 2) configuring data flow properties that are linked to each topic. The underlying IP/ethernet network typically used will have its own set of limitations (i.e., network speed) impacting any communications scheme used in the network in a similar way.
As with food, DDS is “prepared” to meet specific requirements. Yet if one were to look at all of the different ingredients available for meal prep, following a recipe and cooking could become intimidating for a newbie.

- Sending and receiving complex structured data – Your application does not have to serialize or parse data. Applications that use JSON or XML data forms must take responsibility for data management, and because these forms are 2 to 3 times more verbose (containing metadata), network bandwidth is unnecessarily consumed.
- Quality of Service – QoS can be assigned to each structured data set (topic) to manage data flow between nodes. For example, reliability/best effort, persistence (availability of past data samples) and liveliness are just a few of the settings available.
- Scalability – Adding additional nodes to the network is trivial – they simply announce their presence and begin operation.
- Fault tolerance – As with any pub-sub architecture, there is no single point of failure. Node redundancy is easily supported, and historical data can be made available to late-joining nodes.
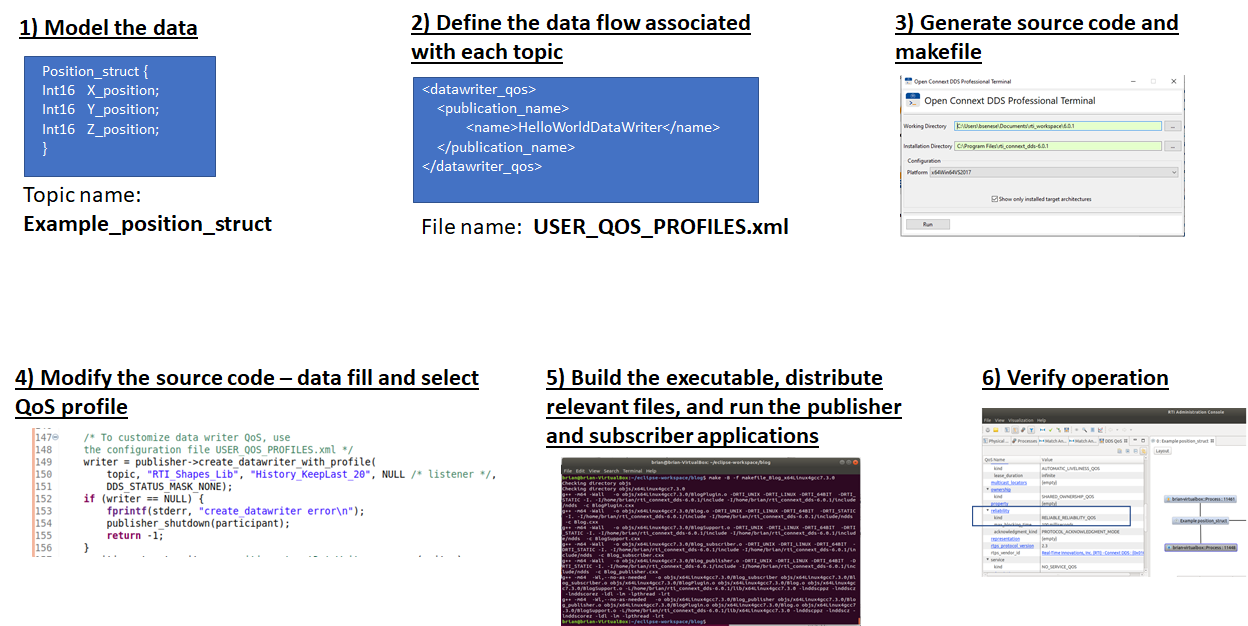
Not all DDS features are needed to successfully support mission-critical real-time systems. With that said, we will walk you through a generic development process for quickly getting a DDS application up and running. The system being designed sends position information in real time (modeled after the RTI Shapes demo). The design process is straightforward:
- Model the data. Design and define the data set(s) that get sent from one node to all others
- Define the data flow associated with each topic (in a QoS XML file)
- Generate source code (and makefile) for Publishers and Subscribers using the data definition from #1
- Modify the source code to: a) Assign values to the data set; and b) Direct the application to the QoS XML file from #2
- Build the executables and distribute the executable and QoS XML file to each node
- Verify operation using Admin Console
Click the image for a larger view
This development was done using Linux, Ubuntu 18.4.1. It can also be implemented on a Windows system as well, with directory locations being slightly different.
What you’ll need to start:
- Installed RTI Connext 6.0.x for Linux
Within the RTI Launcher you can find the following:
- RTI System Designer (Labs section)
- RTI Code Generator (Utilities Section)
- Connext DDS Professional Terminal (Utilities Section)
- RTI Admin Console (Tools Section)
Optional:
- Eclipse for (quick) editing of source code
1 - Model the data
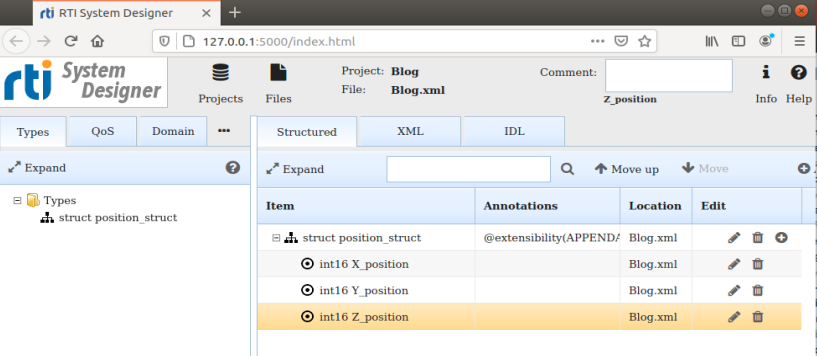
System Designer will be used to create both the data model (in XML form) and assist in the design of the QoS, placing the output into an XML file. On opening System Designer, you can create a System Designer project (i.e., Blog.rtisdproj) which will be stored to your home directory. Additionally, the data sets and QoS parameters will be automatically stored in an XML file called Blog.xml in this directory as well.
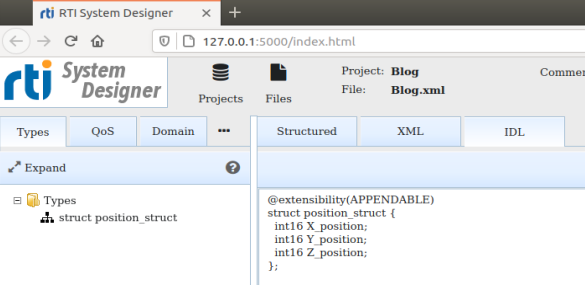
Start by defining a simple data type that is sent from Publisher to all Subscribers. In this example, a simple data structure (called position_struct) is created and is filled with position data (X_position, Y_position and Z_position). This appears under the Structured tab, the tab under which data is defined. Once your data is defined, you can examine it in different forms: IDL or XML.
Click the image for a larger view
In selecting the IDL tab, the data structure is shown in IDL notation. You could copy this from the screen and create a separate IDL file (e.g., blog.idl) and run this file through the code generator to create source code for both pub and sub, but don’t do this. There is an easier way to generate code. We can use the XML representation of the data as created by System Designer; Code Generator can accept XML-defined data (in addition to IDL-defined data). Our simple data set is now defined...and by the way, this data set is going to be a topic in our DDS system.
2 - Define the data flow
“Quality of Service” (QoS) is a DDS term that broadly covers the way data flows between nodes and can take on well over 26 different data management possibilities, such as reliable, best effort, aggregating smaller samples, selecting TCP as a transport and specifying IP addresses. QoS is able to limit how much dynamic memory to use. This is where DDS complexity becomes apparent to the uninitiated, though it need not be intimidating. Your first application can use a pre-set QoS file provided by RTI that has been provided in the Connext DDS software delivery. For this example, we will make use of the QoS feature of reliability. Reliability guarantees delivery of the data sample to all subscribers.
System Designer creates an XML file based on QoS settings you specify. But to make this easy, you can upload a pre-configured QoS file to System Designer and fine tune the settings to address your requirements.
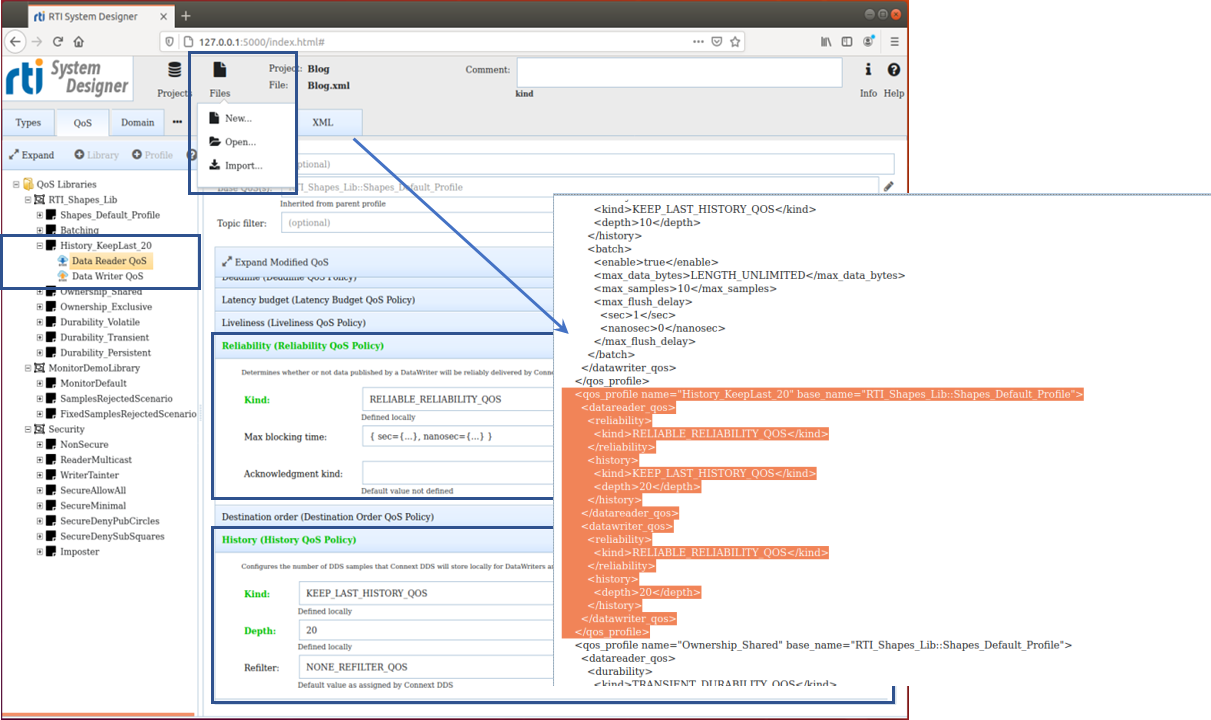
To get a pre-written QoS, select Files (top menu), then Import. The file to specify (in Linux) is: home/rti_connext_dds_6.0.1/resource/xml/RTI_SHAPES_DEMO_PROFILES.xml. This action will load a pre-made QoS library (called RTI_Shapes_Lib) that contains many different profiles – only one of these profiles included in the library will be used in the final application. We will modify the profile called History_KeepLast_20, which is designed to cache the last 20 samples received in the reader. Profiles appear under the library heading in System Designer, as shown. To modify the profile to support reliable data transfer, take the following actions:
Step 1: Select the Data Reader QoS as highlighted, resulting in a list of the many QoS parameters. Expand the Reliability QoS parameter and select from the Kind, Reliable_Reliability_QoS. The reader is now set up for reliability, and will also have a cache of 20 previously-sent samples in memory.
Step 2: We need to create a similar QoS setup for the writer -- this is done by selecting History_KeepLast_20 and then clicking on Create Data Writer, which appears in the right window. Data Writer QoS will appear under the profile heading History_KeepLast_20. By clicking on this new profile, all QoS parameters will appear – you just need to set them up in the same way as the reader. Set History with Kind: Keep_Last_History_QoS and Depth: 20 (number of samples to keep in memory and that are used when resending samples if the network drops any). Set Reliability to: Reliable_Reliability_QoS.
The QoS file used by both Publishers and Subscribers has now been created. By clicking on the XML tab, the XML formatted QoS file will be shown and highlighted among all of the additional profiles in the library. Although a bit voluminous, the QoS library contains the profile (History_KeepLast_20) for data reader and data writer that will now support reliable data transfer.
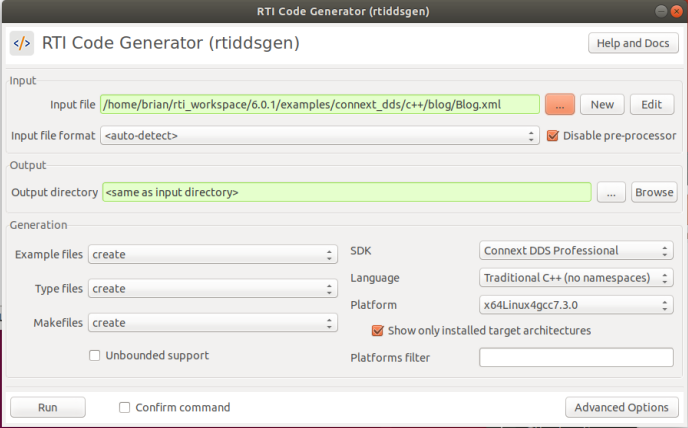
A file called Blog.xml is constantly updated by System Designer and contains both data set (topic) information and QoS information. This file will be used directly by the RTI Code Generator to create all source code for Publisher and Subscriber.

Click the image for a larger view
Click the image for a larger view
3 - Generate source code
The use of the RTI Code Generator will be the next step to take. For organizational sake, move (or copy) your Blog.xml to an empty directory, as we will now generate application source code, modify it and then build the final executable. Invoke the RTI Code Generator and within the program window, point to the Blog.xml file created and have the generator create all source code (in C++ for this example).
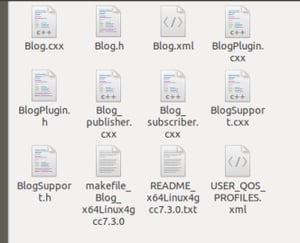
The source code files that have been created are shown below and the makefile is also created. Readme.txt gives instructions on how to build the executable…but we will save that for later.
Since we are coming to the end of Part 1, it's a great time for you to take a look at the generated code and get familiar with it. Blog_publisher.cxx and Blog_subscriber.cxx are the two modules containing the code of interest.
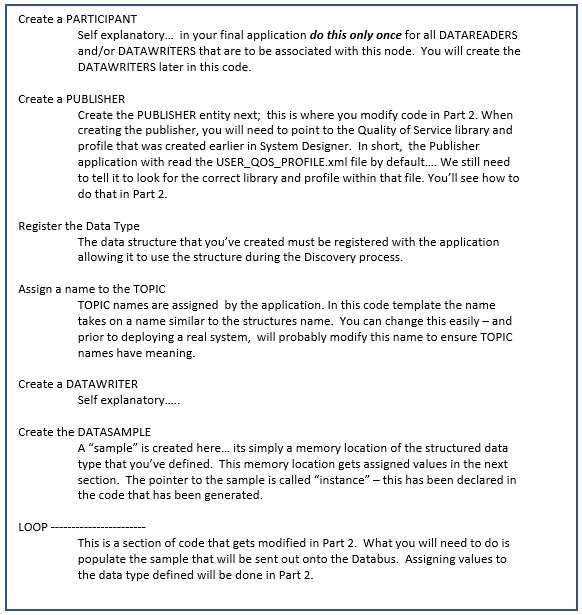
The structure of Blog_publisher.cxx is presented below and illustrates the logic of a DDS application. There are two areas where this needs modification: 1) directing the application to use the QoS configuration that we have created; and 2) populating the topic (called a sample) with relevant data. DDS systems send structured data through the network efficiently, and you as a developer must populate that sample with the data. We will do that in Part 2.
One final point I’d like to make: The rate at which samples get sent is dictated by the application. Note that in the generated code, there is a specified sleep period within the loop to slow down sample transmission. I’d encourage you to look at the code – you will be looking at it for Part 2 anyway, so why not get familiar with it now? The Subscriber side of the system is similar, with the exception that it uses callbacks to read incoming data and then writes this data to the terminal screen.
See you in Part 2!
About the author
.jpg?width=200&name=PREFERRED%20(1).jpg) Brian Senese is a Field Applications Engineer for Real-Time Innovations. He received his BSEE and MSEE from the University of Western Ontario, Canada. He has over 30 years of experience in wireless communications development spanning real-time operating systems, protocols and RF. He has spoken publicly at conferences and is a published author of technical articles and books with the intention of guiding developers in achieving results quickly.
Brian Senese is a Field Applications Engineer for Real-Time Innovations. He received his BSEE and MSEE from the University of Western Ontario, Canada. He has over 30 years of experience in wireless communications development spanning real-time operating systems, protocols and RF. He has spoken publicly at conferences and is a published author of technical articles and books with the intention of guiding developers in achieving results quickly.