5 min read
Creating a Cloud-Connected Medical Device Demo using Connext DDS
 Dave Seltz
:
May 18, 2021

Recently, RTI agreed to participate in the demo night for RIoT, an IoT community with over 9,000 members. The theme for the event was sports technology, and we had three immediate goals: we wanted something that would match the theme, something that would be of interest to RTI Connext® DDS Professional users and, crucially, something that could be used and expanded upon in the future.
Since cardio performance is key in sports, we decided on a simple Pulse sensor as the medical device to build our demo around. A Pulse sensor can be purchased inexpensively and is very identifiable to users.
In addition to wanting a demo that was interactive and interesting, we purposefully set out to build a demo that others could emulate. The popularity of Connext as the software framework for connectivity in medical devices has taught us that such a demo would have greater value for developers if it could also be expandable. That way, more and different types of devices could be attached, to anticipate a variety of future project requirements.
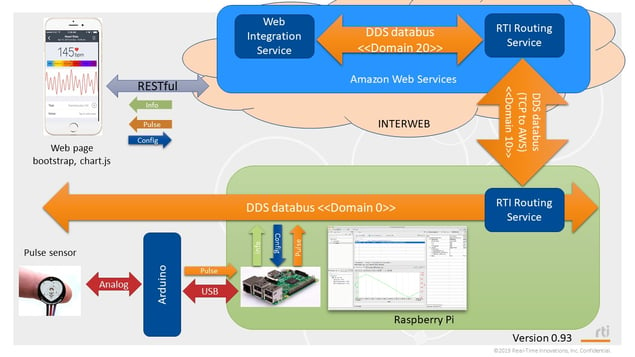
Here is the architecture model we decided on:
We connected the Pulse Sensor to a simple Arduino board, which sends data to an application running on a Raspberry Pi. The Pi runs Connext Professional and sends the DDS data to the AWS (Amazon Web services) cloud using RTI’s Routing Service. On the AWS cloud, we run another Routing Service, sharing that DDS data with the RTI Web Integration Service, which publishes an interactive web page. So users at the RIoT demo event could actually bring up the JavaScript web page on their phone and interact with the demo.
It’s worth noting that the data model, along with our Quality of Service (QoS) settings and the Data Distribution Service™ (DDS) entity definitions were created using RTI System Designer. The System Designer is a browser-based tool that allows you to design and configure a Connext system, outputting an XML-based application definition file. Follow the link to learn more about RTI System Designer.
We broke the project up into six components and assigned a different RTI Field Application Engineer (FAE) to each part:
- The Data Model
- Arduino code
- Raspberry Pi code
- Routing Service setup
- Web Integration Service (WIS) setup
- JavaScript web page
Here are the details and the key points for each part of the project:
The Data Model
Quite often, the first thing you do when starting a project is agree on a data model. Having a common data model saves a lot of time and effort in the long run. From the data model flows how the data is used and how the project will work. In this case we were lucky, because the RTI FAE managers had already created a data model that could be used for projects just like this. This data model defined data types for sensor data and configuration data. We just had to add the Patient data, and voila! We had a working data model. And because DDS is data-aware, we were able to find a data mismatch in the system that would have been very painful to debug otherwise.
Arduino code
We decided to use an Arduino between the sensor and the Pi so we could get real-time(ish) readings. Reading the sensor directly through the Pi’s operating system results in a lot of jitter, which will be especially noticeable to any medical professionals in the audience. Our goal was 150 samples per second.
The board we used was a Seeeduino: Seeeduino XIAO, and the pulse device was a World Famous Electronics Pulse Sensor.
Raspberry Pi code
We used a Raspberry Pi 3 Model B running Raspbian Linux and the Connext DDS Professional ARM armv6vfphLinux3.xgcc4.7.2 libraries. We decided to use the Object Management Group® (OMG®) standard XML-based application creation and dynamic data to simplify development. This is more extended functionality that Connext provides. With XML-based application creation and dynamic data, not only do you save code and a lot of complexity, but you don't have all those data-type files and plugin files that rticodegenerator creates. And understanding the QoS you loaded from XML is straightforward.
With dynamic data, we did not need to use rtiddsgen to generate type code. However, we did need to copy the included files and DDS libraries to the Pi. We also copied the DDS tools and services that will run on the Pi for debugging and execution, including the rtiddsping, rtiddsspy, and RTI Routing Service. Note that for almost all RTI platforms, even the embedded ones, RTI builds local versions of most of the command-line tools so they can be used locally on the target.
RTI Routing Service
RTI Routing Service is an out-of-the-box solution that allows developers to rapidly scale and integrate real-time systems that are disparate or geographically dispersed. Routing Service can be used to bridge DDS applications across different domains to support a system-of-systems architecture.
We used the Routing Service, running on Raspberry Pi, to connect the local network to the Amazon cloud. Another instance of the Routing Service running in the AWS bridges the RTI Web Integration Service. The RTI TCP WAN transport provides a reliable connection between the Pi and the cloud (so it did not need to exist on the same subnet), and our AWS instance required a single public IP address that was reachable. So we ended up having three different DDS domains:
- Domain 0 connects the Pi to the first Routing Service instance (running on the PI).
- Domain 10 connects the RS on the PI to the cloud instance of the RS.
- Domain 20 connects the cloud RS to the Web Integration Service.
RTI Web Integration Service
RTI Web Integration Service (WIS) is an out-of-the-box solution for connecting web-based applications with Connext. In this case, we wanted two-way communication with our Pulse Monitor application, so we employed the Web Integration Services REST API. The challenge we had with WIS in this project was allowing multiple users to potentially access that server at the same time. Luckily, DDS data readers can be configured to cache data for applications, allowing it to be read and reread multiple times. We used this to avoid having the samples "stolen", changing the request to "read()" instead of "take()".
Another issue was the “framing” of the data. The REST interface for reading is a poll-and-respond mechanism that can introduce artificial transitions when the buffer has a combination of old and new data. We had to tune the buffer size to match the number of samples we would display as a set on-screen to avoid ever showing the artificial transition from fresh to stale data (which looked like a heart issue!).
Connext 6.1 to the Rescue!
By using the new WebSocket interface in our recent new Connext release, data can be “pushed” from the server. Unlike REST, WebSockets faithfully publishes the data upon arrival, so the client receives the data with lower latency and with no timing effects.
Next Steps
The next steps in the demo included:
- Establishing a central controller/nurses station that monitors multiple Pulse Sensors on the same local network and even multiple sensors per patient.
- Introducing high-speed WAN transport: Real-Time WAN Transport and Cloud Discovery Service is a new feature in Connext 6.1 that allows for reliable, high-speed communications between DDS applications, across WANs, and through the cloud.
- Adding additional instruments, such as an infusion pump.
- Using XRCE on Arduino: Currently we use a simple serial protocol to communicate pulse data from the Arduino to the Pi. But with the advent of DDS XRCE (Extremely Resource-Constrained Environment), we can use DDS to communicate from the Arduino instead.
- Adopting Connext® DDS Secure: Security is, of course, a major concern for medical devices, so implementing the DDS SecurityTM standard in our project is a natural progression, and this can easily be achieved by deploying Connext Secure.
We Made It Happen
In conclusion, I’m pleased to share that the Pulse Sensor demo was a great success! We had many visitors to our virtual booth, and they were able to not only watch our Pulse Sensor operating live (via a webcam), but also look at, and configure, the pulse data on their phones at home.
The Pulse Sensor demo project was a great learning experience for all the FAEs in the Eastern region. We used many RTI features including the Routing Service, the Web Integration Services, System Designer, Dynamic Data, XML-based Application design. And many debug tools like Admin Console, Wireshark, and rtiddsping. We also learned what it is like to use Connext DDS in a team environment, and how using a single shared data model can simplify everything.
About the author
 David Seltz is a Field Application Engineer for Real-Time Innovations supporting customers in the New England area. David has been in the embedded industry for over 32 years working in engineering and sales roles. Previous to his work at RTI, David was the world-wide FAE manager for Wind River Systems. David holds a Bachelor of Science degree in computer engineering from Lehigh University, and a Master of Science degree in computer engineering from the University of Massachusetts.
Posts by Tag
- Developers/Engineer (180)
- Technology (79)
- Connext Suite (77)
- News & Events (75)
- 2020 (54)
- Aerospace & Defense (53)
- Standards & Consortia (51)
- Automotive (38)
- 2023 (34)
- 2022 (29)
- IIoT (27)
- 2025 (25)
- Leadership (24)
- Healthcare (23)
- 2024 (22)
- Connectivity Technology (21)
- Cybersecurity (20)
- 2021 (18)
- Culture & Careers (15)
- Military Avionics (15)
- FACE (13)
- Connext Pro (10)
- JADC2 (10)
- ROS 2 (10)
- Connext Tools (7)
- Connext Micro (6)
- Databus (6)
- Transportation (5)
- Case + Code (4)
- Connext (4)
- Connext Cert (4)
- Energy Systems (4)
- FACE Technical Standard (4)
- AI (3)
- Oil & Gas (3)
- Research (3)
- Robotics (3)
- Connext Conference (2)
- Edge Computing (2)
- Golden Dome (2)
- MDO (2)
- MS&T (2)
- RTI Labs (2)
- TSN (2)
- ABMS (1)
- C4ISR (1)
- DOD (1)
- ISO 26262 (1)
- L3Harris (1)
- LabView (1)
- MOSA (1)
- MathWorks (1)
- National Instruments (1)
- Simulation (1)
- Tech Talks (1)
- UAM (1)
- Videos (1)
- eVTOL (1)
 Success-Plan Services