 Success-Plan Services
![How to Integrate RTI Connext DDS Micro with Container-Based Applications [tutorial]](https://www.rti.com/hubfs/Assets%202017/handsonkeyboard_1200x627.png)
Container-based microservices are all the rage as software architects and engineers work to bring the flexibility and scalability of the cloud to the edge. To support real-time communication between those microservices with a guaranteed Quality of Service (QoS), DDS makes the perfect companion. This post covers the steps necessary to integrate RTI Connext DDS Micro with container-based applications. The steps required and benefits of the technology will be described in the context of a simple publisher/subscriber example.
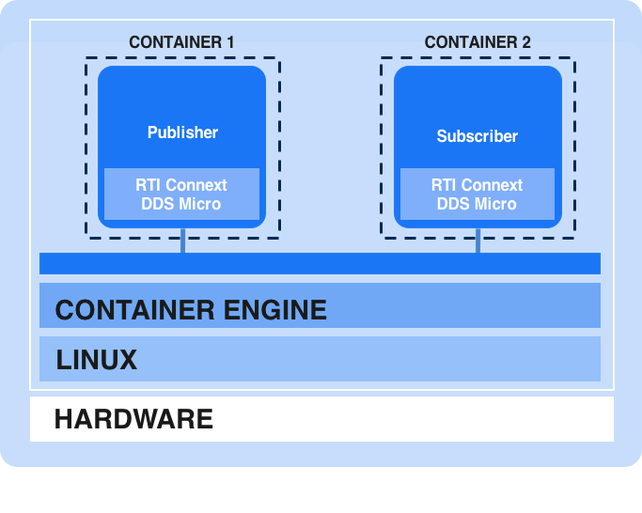
Before we get started a little background is helpful. At an abstract level, containers are used to run individual, isolated applications on your machine. Each container provides operating-system level capabilities making it possible to run isolated Linux systems on one host. Containers serve as a lightweight alternative to full machine virtualization, which requires use of hypervisors to manage multiple operating systems. Docker is the world's leading software containerization platform. As such, it is often used interchangeably when discussing container technology even though there are other alternatives. Please ensure you have Docker installed and functioning correctly on your machine by following the getting started documentation.
One of the first considerations when creating an image is what base image to build on. For our purposes, we use Alpine Linux as the base image for the container. Alpine is a very lightweight, thin Linux weighing in at only 5 MB. Because it is so minimalistic, containers using it have faster build times while still including the most necessary and important functions. This makes Alpine a good option to use with micro-DDS. RTI Connext DDS Micro comes with a large number of pre-built and tested libraries for various operating systems. However, the binaries aren't available for this configuration, but luckily, Connext DDS Micro is available in source code form and can be built easily. So let's get started with that task.
Building the Example
Our first task is to build the Connext DDS Micro libraries and create a build image or build-pack. The goal of the build image is to assist in building the runtime image from source code, 3rd party libraries, etc. Remember that images are the main component in building containers, and when working with Docker the blueprint is contained in a Dockerfile. Here is the Dockerfile for the build image or build-pack:
FROM alpine:3.3

# Install Alpine packages to support build of RTI Micro DDS
RUN apk add --update alpine-sdk bash cmake linux-headers openjdk7-jre && rm -rf /var/cache/apk/*

# Extract RTI Micro DDS host tools and point to Alpine JRE for build
COPY RTI_Connext_Micro_Host-2.4.8.zip RTI_Connext_Micro_Host-2.4.8.zip
RUN unzip RTI_Connext_Micro_Host-2.4.8.zip
RUN rm -rf /rti_connext_micro.2.4.8/rtiddsgen/jre/i86Linux
RUN ln -s /usr/lib/jvm/default-jvm/jre /rti_connext_micro.2.4.8/rtiddsgen/jre/i86Linux

# Extract RTI Micro DDS source and patch for build
COPY RTI_Connext_Micro-2.4.8-source.zip RTI_Connext_Micro-2.4.8-source.zip
RUN unzip RTI_Connext_Micro-2.4.8-source.zip
COPY  patch/posixMutex.c rti_connext_micro.2.4.8/source/unix/src/osapi/posix/

# Build RTI Micro DDS
RUN mkdir /build \
    && cd /build \
    && cmake -DRTIMICRO_BUILD_LANG:STRING=C++/rti_connext_micro.2.4.8/source/unix \
    && make \
    && cp -R /build/lib /rti_connext_micro.2.4.8 \
    && rm -rf /build
It isn't that different than you'd expect to see in a standard build script. The first line identifies the base image to be used. As previously mentioned we'll be using Alpine version 3.3 available from the public Docker registry. Next, we install some build dependencies using apk (Alpine package manager). After that we unzip and patch the source and use traditional cmake and make commands to build the C++ libraries. To build an image from this Dockerfile we change to the directory containing this file and execute the build command.
$ docker build –t dds-base .The –t command tags the image with a human-friendly string versus a randomly generated one for future use. So the build image or build-pack has been created. Let's use this image to create the publisher and subscriber images.
The creation of the publisher and subscriber are similar and accomplished in two steps. The first step uses the previously created build image or build-pack to compile the executable and the second takes the generated executable and packages it in a runtime image. This two-phased approach minimizes the size of the container since the build tools and intermediate artifacts are discarded when the runtime image is created. The two Dockerfiles used in creating the images are intuitively called Dockerfile.build and Dockerfile.run.
FROM dds-base:latest                                    (Dockerfile.build)

# Add publisher source code for build
COPY /src /src

# Compile sources to executable
RUN set -ex \
    && cd /src \
    && /rti_connext_micro.2.4.8/rtiddsgen/scripts/rtiddsgen -replace -language microC++ HelloWorld.idl \
    && g++ -Wall -DRTI_UNIX -DRTI_LINUX -DRTI_POSIX_THREADS -I. -I/rti_connext_micro.2.4.8/include -I/rti_connext_micro.2.4.8/include/rti_me *.cxx -L/rti_connext_micro.2.4.8/lib/i86Linux2.6gcc4.4.5/ -o HelloWorld_publisher -L/rti_connext_micro.2.4.8/lib/i86Linux2.6gcc4.4.5/ -lrti_me_cppz -lrti_me_rhsmz -lrti_me_whsmz -lrti_me_discdpdez -lrti_me_discdpdez -lrti_mez -ldl -lpthread -lrt \
    && chmod +x HelloWorld_publisher \
    && mv HelloWorld_publisher /bin

# copy the runtime dockerfile into the context
COPY Dockerfile.run Dockerfile

#export the dockerfile and executable as a tar stream
CMD tar -cf - Dockerfile /bin
FROM alpine:3.3 (Dockerfile.run)
# Include Standard C++ Library
RUN apk add --update libstdc++ && rm -rf /var/cache/apk/*
# Add service and application
COPY /bin/HelloWorld_publisher /bin/HelloWorld_publisher
RUN chmod a+x /bin/HelloWorld_publisher
# Start publisher using multicast for discovery
CMD ["/bin/HelloWorld_publisher", "-peer", "239.255.0.1"] The two steps are accomplished through a series of docker build and run commands.
$ docker build --force-rm -t dds-builder -f Dockerfile.build .

$ docker run --rm dds-builder | docker build --force-rm -t dds-publisher - ;
The docker build using the Dockerfile.build file copies the source code and builds the binary. The run command creates a container from that built image. When that container executes it packages up the available binary into a tar stream and setups the resources for the runtime image build. The last docker build uses the Dockerfile.run file and the tar stream piped in to copy the files to the appropriate location after installing C++ standard library runtime.
The subscriber follows the exact same approach. Change into the subscriber directory and repeat the previous docker build and run commands using the subscriber rather than the publisher name when tagging the image.
$ docker build --force-rm -t dds-builder -f Dockerfile.build .

$ docker run --rm dds-builder | docker build --force-rm -t dds-subscriber - ;
The images have been built but before proceeding, we should verify that by executing the docker images command. This command lists all the images available in your local registry. You should see the two images we created in the previous steps.
$ docker images | grep dds
REPOSITORY        TAG                 IMAGE ID            CREATED             SIZE
dds-subscriber    latest              0442ffc6ca02        2 minutes ago      8.098 MB
dds-publisher     latest              15fa3c2ed441        4 minutes ago      8.084 MB
Running the Example
Now that we built the images we should take them for a test drive and ensure the example runs successfully. Open two terminal windows. We'll use one for the publisher and the other for the subscriber. In one of the windows start the publisher using the docker run command.
$ docker run -t dds-publisherIf everything is successful you should see the "Hello World" text followed by a number that is incremented after every message is published.
Hello World (0)
Hello World (1)
Hello World (2)
Hello World (3)
Hello World (4)
Hello World (5)
Hello World (6)
…
With the publisher successfully running we can start the subscriber and see if the DDS messages are being received across the two containers over the Docker bridge network.
$ docker run -d -t dds-subscriberThe output should look similar to this, proving the subscriber is working:
Sample received     msg: Hello World (9)
Sample received     msg: Hello World (10)
Sample received     msg: Hello World (11)
Sample received     msg: Hello World (12)
Sample received     msg: Hello World (13)
Sample received     msg: Hello World (14)
…
The number starts with the most recent published because the QoS didn't have any history settings. Both of these containers will continue to run until they are manually stopped or the container engine is brought down. After the learning curve of containers is overcome the rest is just DDS the way you've (hopefully) done in the past.
Next Steps
Linux containers, especially Docker, are providing improvements across the DevOps cycle. They provide a convenient packaging mechanism and promote a modular, microservice based architecture. Using DDS as the data bus between container-based microservices provides an asynchronous publish/subscribe data bus for these services to communicate when traditional synchronous REST-based approaches are insufficient. Together they make a solid choice for the Industrial Internet and Internet of Things software architecture. Take the next step and start using RTI Connext DDS Micro with your container-based architecture today.
Special thanks to Katelyn Schoedl, Research Intern, GE Global Research and Joel Markham, Senior Research Engineer, GE Global Research for authoring this guest blog post - THANK YOU!