 Success-Plan Services
Real-Time Video Data Streaming
Techniques, tuning and tradeoffs for streaming video data in real-time

Introduction
Real-time streaming of video data from distributed or remote locations is often a system requirement, but it can lead the developer down a path of complexity when trying to balance latency and image quality when running on a constrained or congested network.
The technology behind streaming video codecs is continuously evolving; as of this writing, nearly 40 different video codecs are listed on Wikipedia. However, they all share a common trait of converting the video and audio to and from a stream of data.
The ability to stream video is becoming more common, desirable and necessary across industry applications. In particular, it is relevant in surgical procedures, where video data plays a crucial role in providing vital clinical and operational input for improved intraoperative guidance and decision-making, especially when combined and correlated with other data sources. Modern surgery requires video data in order to meet functional and auditory requirements for minimally invasive procedures. When combined with metadata and AI, video data becomes a pivotal information payload, yet requires real-time, reliable data connectivity.
RTI Connext provides the connectivity framework for scalable, secure communications across distributed applications. It is uniquely suited for effectively delivering streaming data in real time across local (LAN) or wide-area (Internet) networks. RTI Connext provides:
- A reliable, scalable, and secure data sharing framework for real-time and distributed communications,
- Transport-agnostic and cross-platform support
- Automatic participant discovery and low inherent bandwidth consumption
- Extensive Quality-of-Service (QoS) features to maximize performance and reliability- including filtering to optimize bandwidth, and history for late-joiners to receive previously delivered video
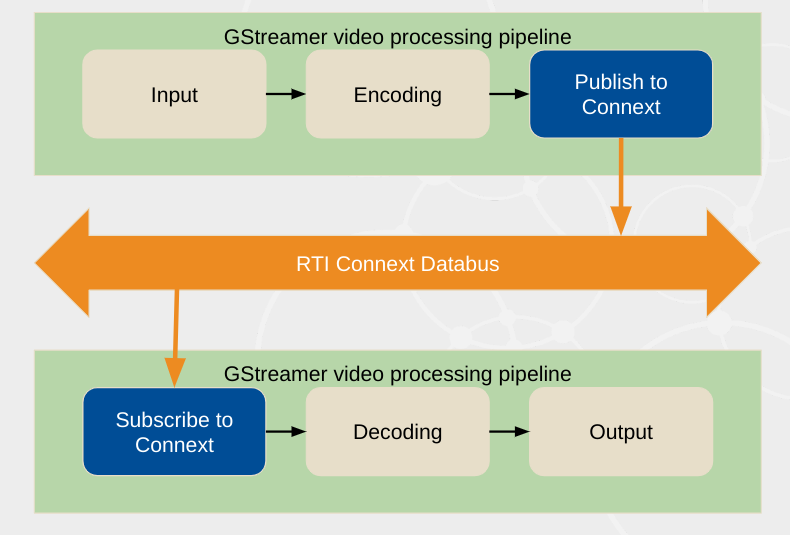
The following example highlights the techniques, tuning and tradeoffs for streaming video data in real-time by focusing on the moving of data, leaving the video codec portion to external processes. In particular, this example is using RTI Connext to create a plugin for the popular GStreamer multi-codec video streaming application.
This example is intentionally lean, with only a few source files to produce 2 plugins:
- connextsink: takes camera frames at the end of a GStreamer pipeline and publishes them with Connext.
- connextsrc: subscribes to camera frames from Connext and acts as a GStreamer source at the start of a pipeline.
This application also comes with a set of QoS Profiles optimized for video streaming across a range of RTI-supported transports, like shared memory, UDPv4, and the RTI Real-Time WAN Transport.
This example has been built and tested on Linux hosts to produce error-free transmission of 1080p high-definition video and audio over extended periods of time. It has also been tested on constrained platforms and across constrained networks using the compression features of GStreamer when needed to reduce the required network bandwidth.
-
What this Example Does
This example can be separated into two modes of operation: Publisher and Subscriber.
-
Building the Example
To build and run this example on your network:
- Install GStreamer including the developer libraries
- Clone the source code from our RTI Community GitHub repository
- Open a terminal in the newly-created directory
- Configure your build environment for RTI Connext
Configure
cd rticonnextdds-gstreamer-plugins

cmake -B build -DCMAKE_BUILD_TYPE=Release
Buildcmake --build ./build --config Release
Installsudo cmake --install build/This will install the plugins and add them to your GStreamer plugin directory so you can use them directly from the command line like other GStreamer plugins.
-
Running the Example
Here are some example pipelines you can use to test the plugin is correctly installed.
Publishing live video
source qos_variables.sh
source buffer_script.sh
gst-launch-1.0  videotestsrc ! x264enc speed-preset=ultrafast tune=zerolatency
byte-stream=true key-int-max=15  ! h264parse !
video/x-h264,stream-format=byte-stream,alignment=au ! connextsink domain=0
topic=Video key=cam1 dp-qos-profile="TransportLibrary::SHMEM"
dw-qos-profile="DataFlowLibrary::Reliable"
This command takes frames from the GStreamer videotestsrc, and encodes it with H.264, and then publishes it using Connext. The connextsink accepts parameters for DDS Domain, Topic name, and the key as defined in /idl/video.idl. It also accepts parameters for DomainParticipant and DataWriter Quality-of-Service profiles. If you are using the provided USER_QOS_PROFILES.xml in this repository, you will need to source qos_variables.sh. You should also run source buffer_script.sh to update the sizes of the send / receive socket buffers. The example above publishes reliably over Shared Memory. The other profiles are optimized for other transports, including UDP and the RTI Real-Time WAN Transport.
Subscribing to live video
source qos_variables.sh
source buffer_script.sh
gst-launch-1.0 connextsrc domain=0 topic=Video key=cam1
dp-qos-profile="TransportLibrary::SHMEM"
dr-qos-profile="DataFlowLibrary::Reliable" ! h264parse ! avdec_h264 !
videoconvert ! fpsdisplaysink
Similarly, this command subscribes using the connextsrc plugin to the Connext databus with the provided domain, topic, key and QoS. The pipeline parses the H.264 encoding and displays it with the GStreamer fpsdisplaysink. There may be some latency depending on the capabilities of your hardware to perform video encoding. The plugin also supports x-raw
With GStreamer, you can customize every aspect of the pipeline you build, allowing for different forms of encoding, as well as adjustments to the resolution and framerate. This allows you to make further performance optimizations depending on your hardware, network environment and available bandwidth. Some of the ways you can do this are described below:
-
Other Useful Tools
On Linux, the following commands may be helpful (you'll need to sudo apt install v4l2-ctl)
v4l2-ctl --list-devicesThis will list the video devices available on your machine.
v4l2-ctl -d /dev/video0 --list-formats-extThis command will list the available output formats of a specific video device (/dev/video0) in this case. This is useful to see what resolutions, framerates and formats your camera is able to support for your GStreamer pipeline.
The output can look like this, depending on the capabilities of the camera you are using:
ioctl: VIDIOC_ENUM_FMT
    Type: Video Capture

        [0]: 'MJPG' (Motion-JPEG, compressed)
            Size: Discrete 1280x720
                Interval: Discrete 0.033s (30.000 fps)
            Size: Discrete 960x540
                Interval: Discrete 0.033s (30.000 fps)
            Size: Discrete 848x480
                Interval: Discrete 0.033s (30.000 fps)
            Size: Discrete 640x360
                Interval: Discrete 0.033s (30.000 fps)
            Size: Discrete 640x480
                Interval: Discrete 0.033s (30.000 fps)

        [1]: 'YUYV' (YUYV 4:2:2)
            Size: Discrete 160x120
                Interval: Discrete 0.033s (30.000 fps)
            Size: Discrete 320x180
                Interval: Discrete 0.033s (30.000 fps)
            Size: Discrete 320x240
                Interval: Discrete 0.033s (30.000 fps)
            Size: Discrete 424x240
                Interval: Discrete 0.033s (30.000 fps)
            Size: Discrete 640x360
                Interval: Discrete 0.033s (30.000 fps)
            Size: Discrete 640x480
                Interval: Discrete 0.033s (30.000 fps)
This camera is able to output two different formats, MJPG and YUY2. You can adjust your publisher pipeline like to use different formats like so:gst-launch-1.0 v4l2src device=/dev/video0 ! 'video/x-raw, width=640,
height=480, framerate=30/1, format=YUY2' ! autovideoconvert ! x264enc
speed-preset=ultrafast tune=zerolatency byte-stream=true key-int-max=15 !
h264parse ! video/x-h264,stream-format=byte-stream,alignment=au ! connextsink
domain=0 topic=Video key=cam1 dp-qos-profile="TransportLibrary::SHMEM"
dw-qos-profile="DataFlowLibrary::Reliable"The above pipeline captures the video from /dev/video0 with 640x480p resolution at 30FPS, encodes it into H.264 format, and then publishes it over Connext. You can modify the second stage of the pipeline with different supported resolutions and framerates. The corresponding subscriber pipeline is the same as the one above:
gst-launch-1.0 connextsrc domain=0 topic=Video key=cam1
dp-qos-profile="TransportLibrary::SHMEM"
dr-qos-profile="DataFlowLibrary::Reliable" ! h264parse ! avdec_h264 !
videoconvert ! fpsdisplaysink
For more information on GStreamer and how to construct your pipeline, refer to the GStreamer documentation.The plugin currently supports raw, unencoded video, and H264 formats. You are welcome to modify this for your use case. The GStreamer Plugin Writer’s Guide may be a useful resource.
When you have completed the Video Streaming Case + Code example, please visit the RTI Community to share your feedback, ask questions and show the world what you built with Connext.
The Video Streaming project repository for this example can be found here in GitHub.
-
Next Steps
When you have completed the Video Streaming Case + Code example, please visit the RTI Community to share your feedback, ask questions and show the world what you built with Connext.
The Video Streaming project repository for this example can be found here in GitHub.
-
Contributions
This plugin example was developed in collaboration with the ESA Human Robot Interaction Lab, and we appreciate their contributions to this project.
We welcome further contributions from the RTI Community.