Connect Real-Time Networks with Connext DDS
This use case applies if you are trying to connect multiple real-time local networks together, or if you are trying to connect a single real-time local network to another network over a wide area network (WAN). This solution supports use cases where each local area network (LAN) site may be a cluster of many RTI Connext DDS applications distributing large amounts of data that should not be sent across the WAN. This solution also supports use cases where sites are geographically distant from each other, and where bandwidth must be conserved. A few examples of this include:
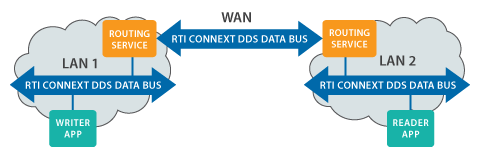
RTI Connext DDS is a high-performance, peer-to-peer middleware that can send real-time data within your LAN, or optionally over a WAN. Part of RTI Connext Professional, the RTI Routing Service allows you to bridge a subset of data between different subsystems. The Routing Service is being used here to send a subset of your local data over a wide area network.
If you need to connect two real-time networks together over a WAN, you can use this configuration to communicate.
This example shows two logical subsystems that represent two LAN environments. These LAN environments are logically separated by DDS domains if you run them on the same network. If you run them on multiple networks, they will be physically separated.
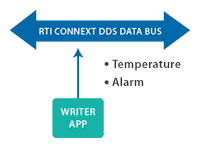
Applications running in one LAN are producing example data from a temperature sensor and an alarm. These two data streams are modeled using DDS Topics named "Temperature" and "Alarm." The temperature sensor is writing "Temperature" data periodically. The alarm writer is also writing "Alarm" data, but it only sends an Alarm when the temperature goes above 100 degrees or below 32 degrees.
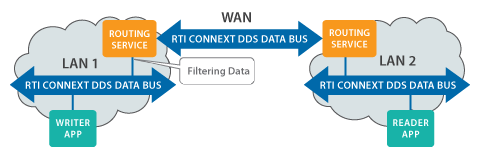
The Routing Service is configured to allow all Alarm data to go across the WAN, but to filter out Temperature data that is within the range of 32 to 100 degrees, to prevent data within this range from being sent over the WAN. This conserves bandwidth by only sending data that's outside that range.
This example also shows you how to update the Routing Service configuration at run time. You can use this in multiple ways such as updating the IP addresses that the Routing Service is contacting, or changing the data that is being filtered to allow different data over the WAN.
Download the example files [ Linux | Windows ] and extract them to a location of your choice. We'll refer to this location in this document as EXAMPLE_HOME.
To view and download the example source code without pre-built executables, visit the RTI Community DDS Use Cases repository in GitHub.
This provides the configuration files for:
If you do not already have RTI Connext DDS Professional installed, download and install it now. You can use a 30-day trial license to try out the product. Your download will include the libraries that are required to run the example, and tools you can use to visualize and debug your distributed system.
This provides RTI Routing Service, which will be used to bridge data over the WAN.
To run this example, on all platforms you must set two environment variables.
The first thing you must do is set an environment variable called ROUTER_HOME. This environment variable must point to the RTI_Routing_Service_5.1.0 directory inside your RTI Connext DDS installation. For more information on how to set an environment variable, please see the RTI Core Libraries and Utilities Getting Started Guide.
For this example, you must also set an environment variable called NDDSHOME. This must point to the ndds.x.x.x directory inside your RTI Connext DDS installation.
After setting the environment variables, navigate or change directories into EXAMPLE_HOME\ExampleCode to find the starting scripts and configuration.
Sending Real-Time Data over the WAN Example - Overview [Download video file]
Run the batch file: scripts\StartSend.bat or the shell script: scripts/StartSend.sh
This will send data in DDS domain 6.
Run the batch file: scripts\StartReceive.bat or the shell script: scripts/StartReceive.sh
This will receive data in domain 5. These two domains are logically isolated, so this application will not receive any data until you run the Routing Service.
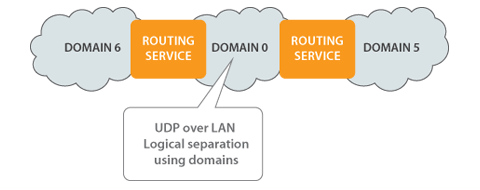
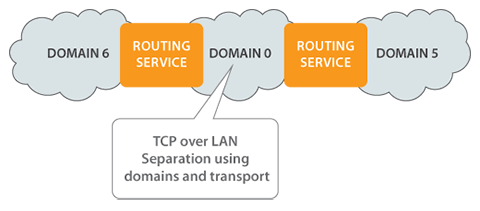
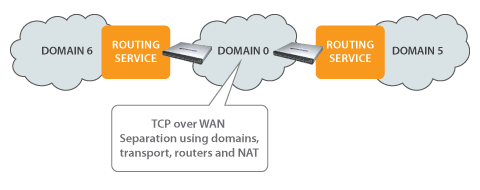
This example includes three Routing Service configuration files. The first one allows you to run on a LAN using UDP. The second one allows you to run on a LAN using TCP. The third one allows you to run on a WAN.
We will start by running the first configuration, because it does not require any changes to work correctly.
After that, we will run the second configuration. You will need to make some changes to run the second configuration.
Last, we will run the last configuration that requires a connection to a WAN, and the ability to configure a router to open ports.
To start Routing Service in UDP LAN configuration, enter the following commands:
scripts\StartRouterUDPLAN.bat Router1
scripts\StartRouterUDPLAN.bat Router2
Once you have changed the XML files and started all of the applications, you should see output similar to this. Note that temperature data is being filtered by the Routing Service if it is between 100 and 32 degrees, so you may not see output immediately. You can change the filtering in the XML file to disable content filtering, or change the filter values.
DataReader "AlarmReader" received sample 3 on Topic "Alarm" sent at 1373936124.699991 s
appID: 234
alarmType: TOO_COLD
alarmLevel: WARNING
DataReader "TemperatureReader" received sample 16 on Topic "Temperature" sent at 1373936125.699991 s
appID: 234
value: 30.000000
DataReader "TemperatureReader" received sample 17 on Topic "Temperature" sent at 1373936126.699991 s
appID: 234
value: 29.000000
DataReader "TemperatureReader" received sample 18 on Topic "Temperature" sent at 1373936127.699991 s
appID: 234
value: 28.000000
NOTE: Before you run these files, you must edit the Routing-TCP-LAN.xml configuration file to include the correct IP addresses. You are running two Routing Service instances, so you must change the configuration in both the Router1 and Router2 configuration sections.
<!-- CHANGE THIS TO THE MACHINE YOU WANT TO CONTACT -->
<!-- NOTE: do not change the port unless you change -->
<!-- the server_bind_port the OTHER configuration   -->
<!-- specifies                                      -->
<element>tcpv4_lan://10.211.55.3:9401</element>
If you need to change the port that is opened by the middleware, you can change that here, but you must update the configuration of the other Routing Service to match:
<!-- Change this to the local port you want to use   -->
<!-- If you change this, you must change the initial  -->
<!-- peers of the OTHER Routing Service configuration -->
<element>
  <name>dds.transport.TCPv4.tcp1.server_bind_port</name>
  <value>9400</value>
</element>
After editing the XML, run the batch file to start each Routing Service instance:
scripts\StartRouterTCPLAN.bat Router1
scripts\StartRouterTCPLAN.bat Router2
NOTE: Before you run these files, you must edit the Routing-TCP-WAN.xml configuration file to include the correct IP addresses and public ports. If your network is using NAT, you will also have to configure your router to map a set of public ports to the internal ports used by the RTI Routing Service. There is additional detail about configuring your router below, in the section DomainParticipants and Configuration for WAN.
<initial_peers>
  <!--                                                -->
  <!-- CHANGE THIS TO THE MACHINE YOU WANT TO CONTACT -->
  <!-- NOTE: Both the IP address and port MUST MATCH  -->
  <!-- the public address used by the other           -->
  <!-- configuration                                  -->

  <!--                                                -->
  <element>tcpv4_wan://18.181.0.32:8500</element>
</initial_peers>

...

<!-- CHANGE THIS TO THE PUBLIC ADDRESS OF YOUR  -->
<!-- LOCAL MACHINE.  YOU WILL HAVE TO FORWARD A -->
<!-- PORT THROUGH YOUR FIREWALL/ROUTER TO MAP   -->
<!-- FROM THIS PUBLIC PORT TO LOCAL PORT 9400   -->
<element>
  <name>dds.transport.TCPv4.tcp1.public_address</name>
  <value>18.181.0.31:8500</value>
</element>

<!-- Change this to the local port you          -->
<!-- configure in your router/firewall          -->
<element>
  <name>dds.transport.TCPv4.tcp1.server_bind_port</name>
  <value>9400</value>
</element>
After editing the XML, run the batch file to start each Routing Service instance:
scripts\StartRouterTCPWAN.bat Router1
scripts\StartRouterTCPWAN.bat Router2
All three of the RTI Routing Service configuration XML files are very similar. They all contain configuration for the domains the Routing Service operates in, which data streams are allowed to go through the Routing Service, and the QoS for those data streams. The simplest configuration contains nothing more than this. The more complex configurations also specify TCP transport information.
There are three main components to these configurations that you should know about.
All three of these example configurations show two RTI Connext DDS Topics being sent through two Routing Service instances. The Routing Service can be configured to route all Topics, or a subset of Topics. In this case, the Routing Service is explicitly configured using <topic_route> tags to send only the Temperature and Alarm topics. Any other Topics in the LAN will not be sent through the Routing Service across the WAN.
<topic_route name="AlarmForward">
  ...
  <!-- The DomainParticipant in domain 6 that uses UDP -->
  <input participant="1">
    <topic_name>Alarm</topic_name>
    ...
  </input>

  <!-- The DomainParticipant that uses TCP in domain 0 -->
  <output>
    <topic_name>Alarm</topic_name>
    ...
  </output>
</topic_route>
A Topic Route is unidirectional. So if you want to send Topic data in both directions across the WAN, you must create two Topic Routes. The only difference between the forward and backward Topic Routes is which DomainParticipant is configured to be the input.
The Alarm data that is being sent in this example follows a State Data pattern. That means that it is not changing constantly and it must be available for any late-joiner that enters the network.
The Routing Service uses TCP to transmit data, which adds reliability at the transport level. However, this does not prevent data from being overwritten in the Routing Service if it is flowing faster than the Routing Service can process it. This means that if there were a burst of Alarm updates, they might be lost by the Routing Service. In addition, the current Alarm data needs to be transmitted to any new cluster that comes online. To support this, the Alarm data is configured to have RELIABLE reliability and TRANSIENT_LOCAL durability enabled.
<datareader_qos name="StateDataReader">
  ...
  <reliability>
    <kind>RELIABLE_RELIABILITY_QOS</kind>
  </reliability>
  <durability>
    <kind>TRANSIENT_LOCAL_DURABILITY_QOS</kind>
    </durability>
  <history>
    <kind>KEEP_LAST_HISTORY_QOS</kind>
    <depth>1</depth>
  </history>
</datareader_qos>

<datawriter_qos name="StateDataWriter">
  ...
  <reliability>
    <kind>RELIABLE_RELIABILITY_QOS</kind>
  </reliability>
  <durability>
    <kind>TRANSIENT_LOCAL_DURABILITY_QOS</kind>
  </durability>
  <history>
    <kind>KEEP_LAST_HISTORY_QOS</kind>
    <depth>1</depth>
  </history>
</datawriter_qos>
The Temperature Topic is sent periodically. Because it is reasonable to miss an update of the Temperature Topic, the Routing Service is configured to use BEST_EFFORT reliability. The TCP transport will ensure that the Temperature is reliably sent between the two Routing Services over the WAN, but it will not guarantee that it isn't overwritten internally in the Routing Service's queue.
<datareader_qos name="SensorDataReader">
  <reliability>
    <kind>BEST_EFFORT_RELIABILITY_QOS</kind>
  </reliability>
</datareader_qos>

<datawriter_qos name="SensorDataWriter">
  <reliability>
    <kind>BEST_EFFORT_RELIABILITY_QOS</kind>
  </reliability>
</datawriter_qos>
In addition to the reliability QoS, you can choose to filter out some periodic data if it should not be flowing across the WAN, based on the content of your data. You can configure this using the <content_filter> tags within the Topic Route. The filter strings will resemble the WHERE clause in an SQL statement. In this example, we want the Temperature data to be sent across the WAN only if the field 'value' is greater than 100 or less than 32.
<content_filter> <expression>value > 100 OR value < 32</expression> </content_filter>
The configuration for the Routing Service communicating over the WAN is contained in the Routing-TCP-WAN.xml file. This is the only configuration file you need for sending data across a WAN. It contains a configuration section for each of the two Routing Service instances that are running on either edge of the WAN.
To configure which domains and transports the Routing Service instances should use, you must configure at least two DomainParticipants for each instance of the Routing Service. DomainParticipants are configured using the <participant_1> and <participant_2> tags. This is where you must specify:

The DomainParticipant's transport configuration is located in the <participant_qos> tags. It contains information on which transports to use, and how to contact a remote application using a public address. You have to do the mapping between the public address and an address with each LAN.
<participant_qos>
  <!-- Turning off the shared memory and UDPv4/UDPv6 transports -->
  <transport_builtin>
    <mask>MASK_NONE</mask>
  </transport_builtin>
  <discovery>
    <initial_peers>
      <!-- -->
      <!-- CHANGE THIS TO THE MACHINE YOU WANT TO CONTACT -->
      <!-- NOTE: Both the IP address and port MUST MATCH  -->
      <!-- the public address used by the other           -->
      <!-- configuration                                  -->
      <!--                                                -->
      <element>tcpv4_wan://18.181.0.32:8500</element>
    </initial_peers>
  </discovery>
  <property>
    <value>
      <element>
        <name>dds.transport.load_plugins</name>
        <value>dds.transport.TCPv4.tcp1</value>
      </element>
      <element>
        <name>dds.transport.TCPv4.tcp1.library</name>
        <value>nddstransporttcp</value>
      </element>
      <element>
        <name>dds.transport.TCPv4.tcp1.create_function</name>
        <value>NDDS_Transport_TCPv4_create</value>
      </element>
      <element>
        <name>dds.transport.TCPv4.tcp1.parent.classid</name>
        <value>NDDS_TRANSPORT_CLASSID_TCPV4_WAN</value>
      </element>
      <!-- CHANGE THIS TO THE PUBLIC ADDRESS OF YOUR     -->
      <!-- LOCAL MACHINE. YOU WILL HAVE TO FORWARD A     -->
      <!-- PORT THROUGH YOUR FIREWALL/ROUTER TO MAP      -->
      <!-- FROM THIS PUBLIC PORT TO LOCAL PORT 9400      -->
      <element>
        <name>dds.transport.TCPv4.tcp1.public_address</name>
        <value>18.181.0.31:8500</value>
      </element>
      <!-- Change this to the local port you             -->
      <!-- configure in your router/firewall             -->
      <element>
        <name>dds.transport.TCPv4.tcp1.server_bind_port</name>
        <value>9400</value>
      </element>
    </value>
  </property>
</participant_qos>

You can find more information on this configuration in Chapter 7 of the RTI Routing Service User's Manual.
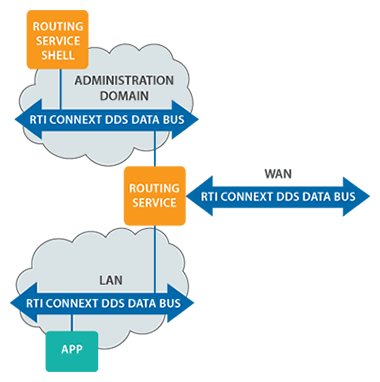
You can change the RTI Routing Service configuration at run time, including changing the filters that the Routing Service uses. Some parameters require that you disable the Routing Service before updating, and others can be changed at runtime without disabling the Routing Service first. We will look at updating the content filter parameters at runtime, which does not require you to disable the Routing Service first.
To update the content filter using the RTI Routing Service shell, first change directories to the EXAMPLE_HOME/ExampleCode/routing directory. Then, open the shell. In this example, the administration commands are sent in domain 3:
"C:\Program Files\rti_connext_dds-5.3.0\bin\rtirssh.bat" - domainId 3
When you do this, you will now be able to send commands to the two Routing Service applications. Every command contains two important parts:
In this case, we want to update a filter expression in this part of the configuration:
<routing_service name="Router1">
  ...
  <domain_route name="DataDomain">
  ...
    <session name="SessionForward">
      <topic_route name="TemperatureForward">
        ...
        <content_filter>
The command to update the Routing Service configuration has the following parameters:
update <target_routing_service>
    [<entity_name>] [<xml_url>|<assignment_expr>]
    [remote|local]
In this example, we have created a file called Filter-Update.xml that contains changed parameters for the content-filtered topic. To use update the Routing Service with the values in this file, type the following:
update Router1
    DataDomain::SessionForward::TemperatureForward
    Filter-Update.xml local
The name of the Router is the first parameter of the command, and then the entity in the hierarchy that we are changing. The third parameter is the name of the file that contains the update. The last parameter specifies that the file path is local to the Routing Service Shell, rather than local to the Routing Service application.
Sending Real-Time Data over the WAN Example - Updating [Download video file]
This example uses Lua to generate interesting data sets. There is more information on how this works in this example on our community portal.
Post questions on the RTI Community Forum.
Contribute to our Case + Code examples on RTI Community GitHub using these instructions.
Check out more of the RTI Connext DDS products family and learn how RTI Connext DDS products can help you build your distributed systems. If you haven't already, download the free trial.
© Copyright Real-Time Innovations. 2007-2018. All rights reserved.


